Introduction
When one of my workmates arrived one morning in the office with a 60% mechanical keyboard, I knew I needed that kind of stuff sooner or later. The sooner the better. At this time, I was deeply into becoming a real touch typist and a good vimer too. It was the perfect time to get into this.
If you don’t know what a mechanical keyboard is, have a look at /r/mechanicalkeyboard. But watch out! If you like what you see on this subreddit, you might become soon obsessed with the idea of getting the best mechanical keyboard for you. And before you realize it you will end up watching people soldering switches on youtube.
That is what happened to me. I decided I needed to get one of those awesome keyboards. But which one ?
These are my requirements:
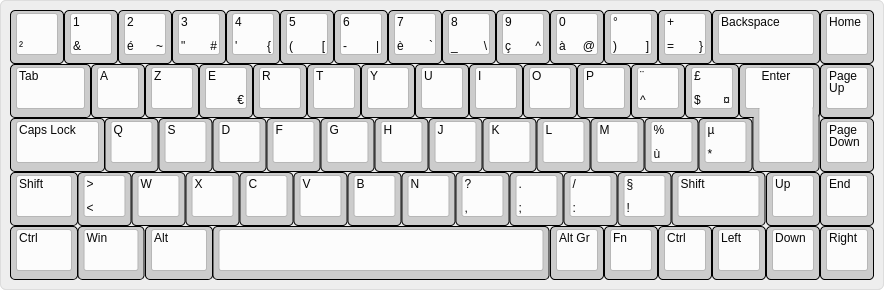
- It needs to be an
ISO-AZERTY-FRlayout as every single keyboard around me. - It needs to be very close to my laptop layout as I want my experience to be consistent when I switch between this keyboard and my built-in laptop keyboard.
- I like small keyboards, I don’t like keypads and I can live without function
keys. I use only
F2to rename a file, andF5to refresh. - But I cannot live without arrow keys.
- It needs to support qmk so I can program shortcuts for keys I use not very often, like function keys for instance.
At first, I tried to find a stock keyboard that ticks all these boxes. But soon I realized that if I wanted all this I had to build one myself.
And this started a very long hunt on the web to find all the required parts to build a DIY mechanical keyboard. And every single part comes with a lot of variants so in the end that takes a huge amount of time.
Layout
This is the more important thing to choose. There are a lot of layouts one can choose from: 60/70-/75/90/100%. 100% is your standard full size keyboard with 100% of the keys. The other ones have less keys according to their percentage. Regarding my previous requirements, for me the perfect layout is 65%: no function keys, no numpad but the arrow keys are here.
Once the layout is chosen, next step is to find a board which permits that kind of layout. There aren’t that many boards that can support ISO variant. I decided to go with the xd68. A nice board which supports a lot of different layouts and qmk as well. It’s got built-in LEDs and it is also possible to solder LED underneath each key. But I’m not interested in this.
I setup an AZERTY layout with a few custom options and combos that might be the subject of a another post. My configuration is available on github.
Switches
There are a lot of different switches out there and to be honest, it is very hard to choose without actually trying them. I wanted switches with an actual feedback feel but I did not want to be bothered with clicky sound.
I tried the switches on my friend keyboard and they feel good enough. So I decided to go with the same switches as him: some Gateron brown silent switches.
Key caps
A lot of choices here again, between the different profiles, colors, materials, with printed labels or blank. This is the ultimate customization for your keyboard, so you want to get that right.
The best key caps for typing are supposed to be OEM profile. But on this type
of key caps the profile is different on each row. It means that you can’t use
any key anywhere. It might be a problem for my column on the right of the enter
key as I won’t be able to use a Pge Up or Pge Down key from another key set
for example.
I really wanted to have labels on my keys. But I realized that with such an uncommon layout and my strong desire to stick to ISO, it is nearly impossible. I know there are companies which are able to make you key caps for your custom layout but it is very expensive.
So I decided that it was not worth it. I went for blank OEM key caps but even so it was quite a challenge to find a place which sells all the keys I needed.
Part list
Here are the parts I bought for my build:
| Part | Price |
|---|---|
| xd68 board | 26.71 € |
| Plate | 15.13 € |
| Case | 26.71 € |
| OEM Tada68 blank key caps | 18.90 € |
| OEM ISO bland add on | 6.64 € |
| Screw in stabilizers | 9.59 € |
| Gateron switch silent x90 | 31.57 € |
| Total | 135.43 € |
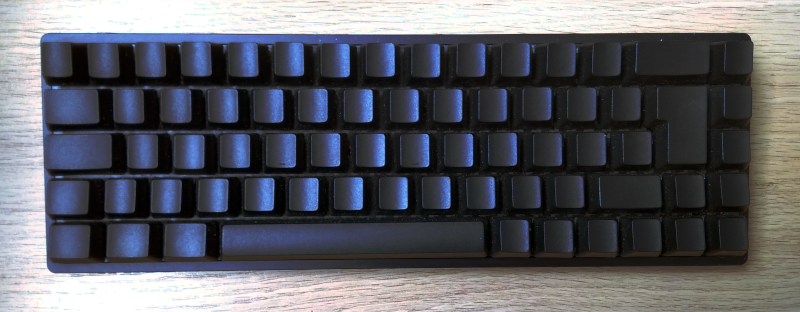
Result
The research for the parts was very exhausting. There are way too much choices. Looking for all the parts and making sure everything will work nicely together takes a huge amount of time. But doing the actual build was a lot of fun. And the soldering was very easy.
It didn’t cost me too much overall and I am very happy with the result. Typing feels great and the blank key caps actually helps me becoming a good touch typing.
Building a mechanical keyboard is so much fun and the result is so nice that a lot of people becomes addicted in building mechanical keyboards. Looking relentlessly to make a better keyboard with their next build.
Well that’s not my case. I’m very happy with this simple plain keyboard.