I have been looking for a simple yet versatile hackable e-ink screen for a while. I had no idea what I would do with one but I knew I really wanted one. I like how these screens are so low power and how easy e-ink is on the eyes. I have a Kobo reader and this is definitely my favorite electronic device. I have a few projects in my backlog for that reader by the way. But that’s another story.
So when Pimoroni released its Badger 2350, I was very interested and I pre-ordered one straight away. It includes everything you need out of the box: wifi, bluetooth, buttons and a battery. You can get the full technical details on the Pimoroni website. You can program it using micropython and Pimoroni developed a few easy to use libraries to draw on the screen, read the buttons, connect to wifi and so on. I was not really excited by using python for this project to be honest. That’s ok, I’ll start with that, but I might rewrite that firmware in a lower level language later on, like Rust, Zig or even C. We will see.
Anyway I got mine in the mailbox a few weeks ago and then I thought “Now what? What am I going to do with it?”.
I first developed a simple badge for myself when I go to conferences, simple enough.
![]()
Then I got an idea. I have a Home Assistant installation at home connected to a few zigbee devices, a cat feeder, a couple of smart bulbs, plugs and a few temperature sensors. I have a temperature sensor in my office. I thought it would be fun to use that badge to display its data.
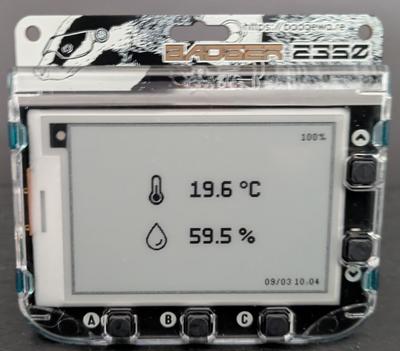
Now how can that work? zigbee2mqtt manages the zigbee devices and exposes them to Home Assistant via the message broker mosquitto. The data I’m interested in is available via mosquitto. If I had an MQTT client and listened to the sensor topic, I’d get the data I need. The badger would need to connect to the WIFI and implement an MQTT client. Looks like a plan.
Unfortunately after a few tests I saw that it couldn’t work that way. My router is too far away and the WIFI signal is too weak for the badge to connect to it.
Second option is for the badger to get the data via bluetooth. It is actually a better option for a low powered device like that. Bluetooth and especially BLE is more energy efficient than WIFI. And it happens that my MQTT broker runs on a Raspberry Pi 5 which has bluetooth capabilities. Here is a diagram of how that would work:
  flowchart LR
      A[Sensor] <-->|Zigbee| B[zigbee2mqtt]
      B <-->|MQTT| C[Bridge app]
      C <-->|BLE| D[Badger]
      B <-->|MQTT| E[Home Assistant]
All I need is some kind of bridge between the MQTT broker and the badge. Ok, fair enough, this won’t work out of the box.
But this is great actually! When starting this project, this is exactly the kind of problems I like to run into. I now need to write this program that will run on the Raspberry Pi, and plug the service into my NixOS configuration. I decided to use Rust for this project. I’m starting to have a bit of experience with that programming language and I know that the Rust ecosystem has everything I need to write this program.
I called that program mqttooth. Check it out. The source is available on GitHub along with my fork of the Badger 2350 firmware.