After I built my keyboard, I really thought I was done with DIY mechanical keyboards. As any people into this hobby already knows, I was totally wrong.
It all started when I began to feel pain in my right wrist. Scared by carpal tunnel syndrome, I was looking for a way to relieve it. I looked carefully at my posture and how I was positioning my arms on my keyboard and mouse. As it was the right wrist, my first assumption was that my usage of the mouse was the primary cause my pain. Looking for a solution, I stubbled upon a great and yet super simple hack: put the mouse on left side of the keyboard. Such a simple idea ! No need to buy a fancy new mouse, no need to reconfigure anything (most left handed people use their mouse as right handed anyway), just put the mouse on the left of the keyboard and that’s it, done. It takes a little bit to get used, but after a couple of hours it is as easy as it gets. And also I think the left side of the keyboard is a better mouse location for right handed people. I now have completely recover from my wrist pain but I still keep my mouse on the left. I found it great because it allows me to have a notebook on the right to take notes, hold a cup of coffee or handle a phone while browsing the web.
That mouse hack is great but that was not enough. My right wrist still hurt. I was starting to suspect the keyboard, especially the one on my work laptop which is super bad for many different reasons but especially because it is small, even smaller than MX spaced (the space between keys on most keyboards). It is small despite the fact that there is enough room for a bigger keyboard which is silly when you think about it. It has been set small to make room for a keypad, something that can easily implemented as a separate layer (that’s what Lenovo does for instance). I really don’t get why laptop builders keep adding keypad to their laptop keyboard.
Anyway, I thought I should give a try to something more ergonomic such as a split keyboard. Put the sides apart, and then my wrists would not need to bend that much. I was first thinking about buying a pre-made one, such as the Kinesis Advantage 2 or the moonlander, and be done with it as soon as possible. But I soon realized that it was way too much fun to build one myself to miss this occasion.
And I dug again into reddit especially /r/ErgoMechKeyboards to find the answers to the many questions I had. Which layout should I choose ? With or without a number row ? Row, column staging ? Ortholinear ? Pre-soldered or soldered by myself ? So many choices need to be made, fortunately my previous experience gave me some answers about switches and key caps.
My concern is always to try to stay as close as possible to the experience we
have on a regular keyboard while solving its main flaws. I learned touch
typing and I’m going to keep using regular keyboards. I want to built on that
skill that I have now, and not start to learn just another way of typing. So as
beautiful as minimal keyboards
are, that’s not an option for me. I will stick with AZERTY layout and a
number row. I also want all modifiers, Shift, Ctrl, App and Alt on each
side to minimize hand contortions: hold the modifier with one hand, hit the
target key with the other. Row stager was useful for typewriters, but really it
makes zero sense to keep that in 2023 . And finally it must of course support
qmk the great keyboard firmware.
I decided the Sofle had the right layout for me. I just would need to level up my soldering skills, a bunch a very small LED needs to be soldered and I have never soldered SMD components before. That should be a good occasion to do that.
And here is the result:
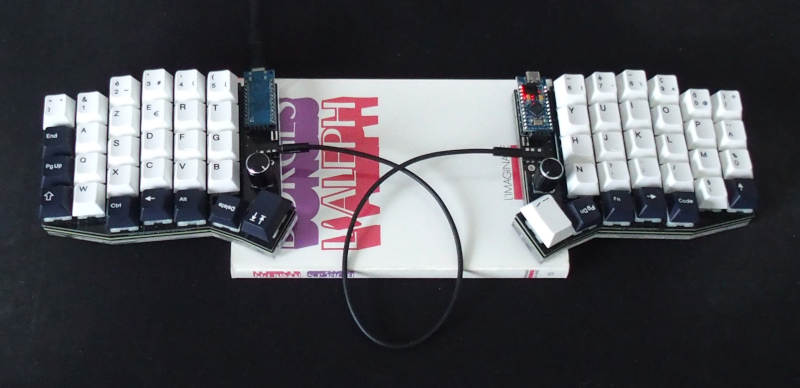
As a touch typist, it was surprisingly easy to adapt, feeling comfortable after a few weeks. Each finger having its own dedicated rows makes it easy to adapt.
I put the Enter and Delete on a thumb key. We use them all the time, it
makes sense to put them under a strong finger. The arrows, Page up, Page down, Home, End are on a separate layer. Using the arrows keys there was
the most difficult thing to get used to for me. The right Alt key on an
AZERTY keyboard, also known as Alt Gr has a weird use, it is not really
used as a modifier but act as some sort of symbol layer. So I decided to create
an actual layer for those symbols with the activation key a hold on Enter. As
I put the Enter key under the right thumb, the result would be very close to
what we have on a regular keyboard. And now I can set the modifiers keys
perfectly symmetrical which makes a lot more sense to me.
About the rotary encoders, they can each be mapped to three keystrokes basically. One when you push it down and one for each rotation side. Rotating the encoder sends repeatedly a key to the computer, nothing fancier than that. I’d say it’s fun and looks good but not super important. I mapped them to multimedia keys:
- for the left one:
Toggle playwhen pushed,Next/Previous trackwhen rotated - for the right one:
Toggle mutewhen pushed,Volume up/downwhen rotated
The full layout is available here.
The thing that I found a bit disappointing was the OLED screens. Really it is of no actual use and it is super hard to make them hold very sturdy to the board. After having them for a few months, I removed them.
But overall, I super happy with this build. It was a lot of fun and I feel that my pain has gone completely. I now think about building a travel version of that one to carry along with me when I’m on the go. So, to be continued…